This article was published in the March, 2003 CORSA Communique and was updated in January, 2004 based on feedback from Jim Bannister.
I love driving my 1966 Corvair 500 coupe and am not worried about its originality, unlike my 1966 Corsa convertible. Because I drive the coupe nearly every day, safety is a significant concern. Since 1995, I have looked at several ways of adding shoulder harnesses (3-point belts) to the car:
- Installing factory-type accessory shoulder harnesses using the factory-installed mount points in the ceiling of the coupe [1]. I ruled this out due to the poor adjustability of the setup—no retractors—and scarcity of the belts, although some could probably be fabricated.
- Installing aftermarket shoulder harnesses with retractors using the factory ceiling mount point. This would require cutting a hole in the inside quarter panel and mounting the retractor below the window mechanism. I wasn't sure if this would really work and it seemed like a lot of trouble. It also would result in part of the belt being visible through the rear quarter window (the vertical section from the retractor to the mount point).
- Installing aftermarket shoulder harnesses using a new ceiling mount point, located further forward than the stock location. This would allow a retractor unit to be mounted on the floor in front of the rear seat but it hampers access to the rear seat.
As you can deduce, I didn't like any of these solutions. In 1999, I had the pleasure of renting a Chrysler Sebring convertible while at the Great Western Fan Belt Toss & Swap Meet. I really liked the comfort of the seats with the integrated shoulder harnesses. I noticed that no matter how the seat was positioned (forward, back, reclined, etc.) the belt tracked with the seat back and was always comfortably located. Having unrestrained access to the rear seat was also great. The six-way powered driver's seat was a nice bonus!
This article will explain the process I went through to obtain and install a set of these seats in the Spring of 2002. Mike Dobie, a fellow CORSA Board member, is also finishing such an installation using a different mounting method. Perhaps he will write an article about his experiences too.
Understanding how the seats work
The seats that are the simplest to install are from the 1996-98 model years. [2] 1999-2000 seats have the necessary electronics spread out into two different modules, making hookup problematic. If you can only find seats from a 1999-2000 car, I highly recommend buying the electronics module new from Chrysler for 1996-98. I was able to find 1997 model-year seats from a wrecking yard for $450, including the electronics.
The electronics were changed substantially beginning with the 2001 model year and installing a system from that year or later is not covered in this article. See below for more information.
In 1996 only, Chrysler produced a separate service manual supplement covering just the items unique to the convertible. It's priced at a very-reasonable $17 plus shipping & handling. This manual is a good source of information and is worth owning. (The later-year complete manuals are a whopping $90!) To order, call DaimlerChrysler Service Publications (aka Dyment Distribution Services) in Strongsville, OH at (800) 348-4696 or (216) 572-7240. The part number is 96_81_270_6121A.
Below is an overview of the seat design and operation from the 1996 service manual, pp 8M-2 & 3:
"The structural seat with integrated retractor height adjuster allows the seatbelts to comfortably fit a large range of occupants. The seatbelts are attached to the seat instead of the body; this allows better passenger access to the rear seat.
Since the retractor is mounted on a seatback that can recline, a typical seatback g-sensor cannot be used in the retractor. Instead, a solenoid inside the retractor is used to lock and unlock the seatbelt when electrically signaled by a remote g-sensor. The remote g-sensor is located inside the Seatbelt Control Timer Module [3]. The Seatbelt Control Timer Module is located under the center console. The seat retractor and solenoid are located in the seatback and are serviced as an assembly.
When the solenoids are powered, the seatbelt can be moved. When the solenoids are not powered, the seatbelts cannot be moved. This is necessary to ensure that occupants are always safe, even in the case of a power loss during an accident. Whether the seatbelts are in locked or unlocked position, an occupant can always release the seatbelt and it will retract.
The Seatbelt Control Timer Module controls the power to the seatbelt solenoids. It supplies power continuously to the seatbelts whenever the ignition key is in the RUN or ACCESSORY positions. The module has two other unique functions: that of a timer and a g-sensor.
The Seatbelt Control Timer Module was designed with a timer function so that when the vehicle is not in use the battery would not be prematurely drained. The module times out after approximately 30 minutes if no inputs are sent to the module. The module will power the seatbelts for a set period of time when there is an input:
- Either door ajar switch (open or closed)
- Ignition switch moved from RUN or ACCESSORY to the OFF position.
Each time one of these inputs occurs, the timer is reset to keep the belts powered for 30 minutes.
The g-sensor function of the Seatbelt Control Timer Module will cut power to the seatbelts whenever:
- The vehicle accelerates or decelerates at a rate greater than or equal to 0.7g in any direction.
- The vehicle is tilted to an angle greater than or equal to 45 degrees.
Input of ignition switch in the RUN or ACCESSORY positions will cause the module to power the seatbelts for as long as the condition exists."
Beginning with the 2001 model year, the Seatbelt Control Timer Module was eliminated and the electronics were fully integrated with the airbag controls into a unified occupant restraint system. If you wish to use seats from a 2001 model year or later car, you will give up the functionality that the Seatbelt Control Timer Module provides and instead rely on the inertia wheel restraint only because installing the entire occupant restraint computer system is not practical.
As described above, the SCTM holds the occupant in place during airbag deployment, which we don't have to worry about with a Corvair installation, but it also helps keep the occupant from making contact with the interior of the car by holding them more firmly in place than the inertia wheel can do on its own. This seems like a very useful safety feature that you will give up by using the 2001 model year or later setup.
Purchasing the seats
Unless you have lots of cash to burn, you will want to buy used, rather than new, seats. A new set of Sebring convertible seats is close to $2000 while you should be able to locate a pair of used seats for less than $800, perhaps far less. Salvage yards seem to charge widely-varying prices for a pair of them—from $150 to nearly $1000, based on a sample of yards contacted in TX and WA.
Important: Before you lay down cash for used seats:
- Be sure to take the VIN of the donor car to a Chrysler dealer and have them run an outstanding warranty recall check. If any front-seat-related recalls show up as outstanding for the VIN, avoid purchasing those seats (unless the Chrysler dealer will agree to make the repairs for you). For example, I found that in 1997-model seats, the headrest guide bracket was improperly welded to the seat back frame on the passenger side seat back assembly. The headrest support bracket could break, increasing the risk of injury. Dealers replaced the passenger seat back assembly with a new assembly. (Owner notification began July 31, 1997.) I did not check about recalls for other years so you shouldn't assume that 1997 is the only year with issues.
- Check to see if the car has been in a serious accident. If it has, one or more of the belt mechanisms might need to be replaced due to stress. I don't know of a way to test for this, unfortunately. You'll have to use your best judgment based on the condition of the donor car, assuming that you can see the seats before they are removed. Note that the seat belts are designed to lock when the car does not have power so don't assume they are broken if they don't move.
Once you have verified the integrity of the seats, be sure to have the salvage yard also remove the Seatbelt Control Timer Module. This small black box (see Figure 1) is mounted between the seats, under the center console. The box has several small wiring harnesses coming out of it. You need all of the wires going to both seats, with the connectors. The connectors are unique to this application and you must have them in order to attach the wires to the seats and to the SCTM. You also need as much of the wire bundle going to the dash as possible. You don't need the connectors on the dash end; just have the salvage yard cut the wires as far up under the dash as they can reach.
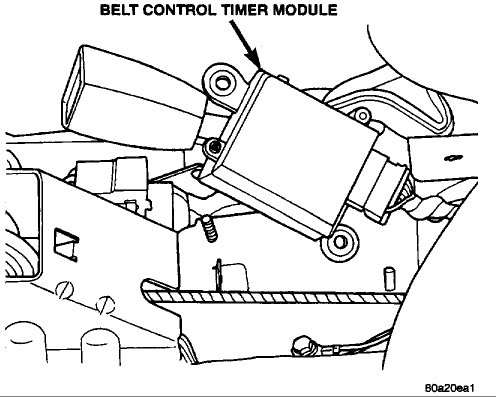
Figure 1: Location of SCTM. View is looking down from the driver's seat area. Gear shift is to the left, slightly out of the picture. Center console has been removed. Object just to the left of the SCTM is the passenger front seat belt receptacle.
Mounting the seats
Because the seat belts are integrated into the seats, the mass of your body always pulls against the seat mounts and the floor pan during a stop. This is a much different situation than typical seats with outboard seat belts, where the belts are mounted separately, and away from, the seat mounts. It should be obvious that an extremely sturdy mounting is critical to successful installation of the seats.
Important: Fabrication and installation of the seat mounts is absolutely not a job for amateur fabricators. Please do not attempt this procedure yourself unless you are an accomplished welder with extensive fabrication experience. Any money you might save trying to do the job yourself will be negated if you are in an accident and the seats come loose from the floor (or the floor peels up with the seats attached)! Proceed with mounting the seats at your own risk. The author assumes no responsibility for the effectiveness of the procedure explained below.
I chose a local fabricator who has 25 years of experience working on street rods and automobile accident forensics so I felt good about his ability to do the job. His procedure was, in outline form:
- Removed much of the existing seat track, leaving just the vertical section running front-to-back.
- Fabricated new tracks, featuring:
- Vertical risers, to provide clearance for the power seat equipment under the driver's seat while keeping the seats as close as possible to the stock Corvair height
- Spacers, to maintain the correct height/angle, with a square or triangular cross-section for strength
- Welded the new tracks onto the old tracks.
- Bolted the new tracks to the floor using the stock Corvair mounting holes plus one extra hole at the rear of each outboard track.
Note that the outboard track on each seat is longer than the inboard track. The extra length provides more floor surface area to support the seat.
The following four pictures show seat track details:
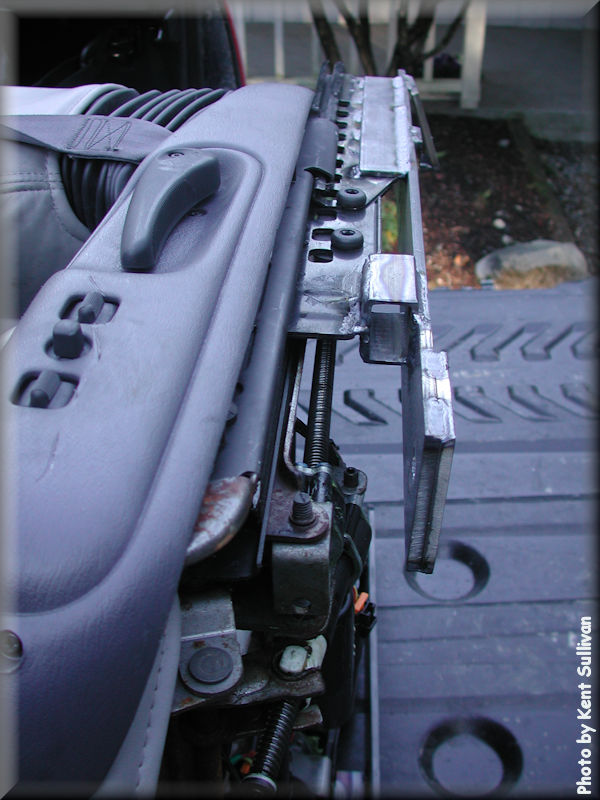
View of driver's seat outboard track, from front of seat (seat on its side). Note the vertical section remaining from the original seat track, the new square spacer in the front (above the track), and the triangular spacer in the rear (below the track).
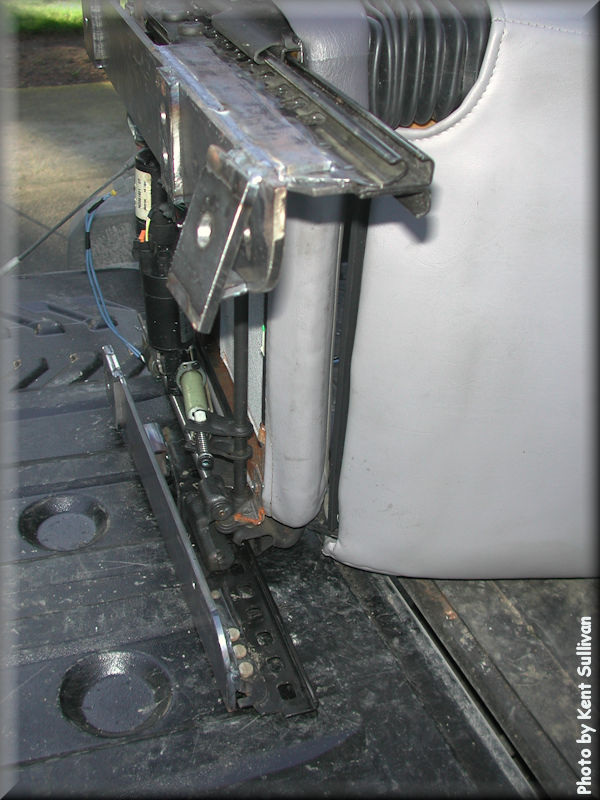
View of driver's seat back, from rear of seat (outboard side up). Note the detail on the triangular spacer at the rear of the outboard track.
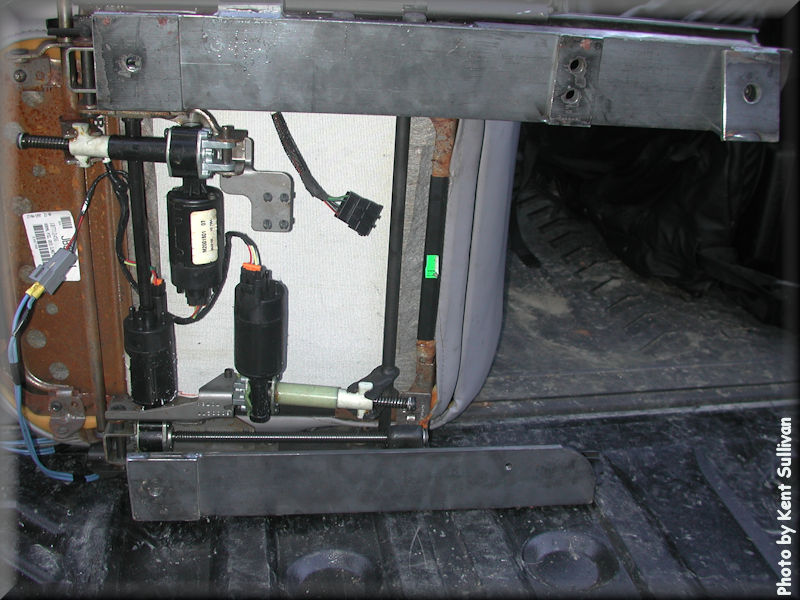
View of driver's seat bottom, front of seat on left (outboard side up). Note that the outboard track is much longer. Also note the mounting holes.
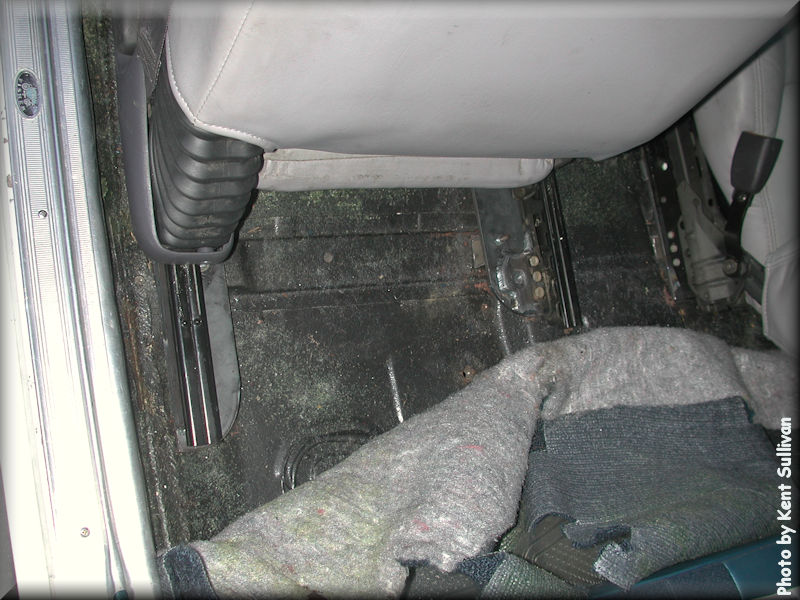
View of installed driver's seat from back seat area.
Mounting and wiring the seat electronics
Unlike the seats, mounting and wiring the electronics can be done easily and safely by almost anyone. You first need to mount the SCTM. I located mine between the two front seats because I wanted to install a center console and realized it would be easy to hide the module inside. If you don't want a center console, you can probably mount the module under one of the seats, although some wires might need to be lengthened. Important: Because the SCTM has a g-sensor in it, the module should be mounted as close to horizontal as possible.
Regardless of where you mount the SCTM, you should orient it with the wiring harness connector pointing rearward, to minimize sharp turns in the wiring harness. The module has mounting ears so it was easy to use self-tapping sheet metal screws to hold it in place. Important: Take off the tunnel pan cover before installing any screws to ensure that you don't damage anything in the tunnel!
The harness has six groups of wires in it. I removed much of the outer harness cover to separate the groups. One group of wires goes to the power amplifier for the stereo. It has a ten-pin connector on one end [4] and will basically fall out of the harness as you remove the outer covering. This group of wires can be discarded. Two groups of wires go to the driver's seat (two wires for the power seat mechanism, four wires for the seat belt solenoid & seat belt switch sense), one group goes to the passenger's seat (two wires for the seat belt solenoid), one group goes to the dash (three power wires, two door ajar switch wires, and one seat belt switch sense wire), and one group goes to a common ground point. The group of wires going to the dash is not wrapped and neither are the ground wires. The other groups of wires are.
As you remove the outer cover you can discard various plastic clips that originally held the harness in place. The harness from your donor car may also have a strain relief loop with a metal tab near the SCTM connector. If so, it's a good idea to drill a hole in the metal tab and screw it to the floor to make use of the strain relief.
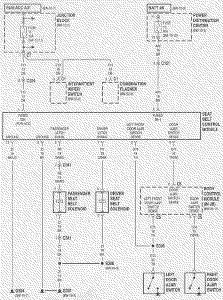
Once you have removed most of the outer wiring harness cover, spend some time familiarizing yourself with the purpose of each wire in the harness, using the description, schematic (Figure 2), and pinout [5] (Figure 3) below, reprinted from the Chrysler service manual. Note: You can easily tell that you have a SCTM and wiring harness from 1996-98 by verifying that there is no wire connected to pin 11 in the SCTM harness. This wire's function is to provide the 30-minute timeout signal for the seatbelt solenoids for the 1999-and-later Seatbelt Control Module that has the timer function relocated to the Body Control Module.
"The seat belt system is used to lock and unlock the seat belts. It consists of a seatbelt control timer module, door ajar switches, ignition switch, and solenoids located in the seats.
When the operator opens the door, the door ajar switch completes a path to ground on circuit G75 for the driver's door, and G74 for the passenger's door. The seatbelt control timer module then supplies voltage to the solenoids located in the seats, unlocking the seat belts.
Circuit R7 provides power from the module to the driver's seat solenoid, and circuit R8 provides power to the passenger's seat solenoid from the control module. Logic internal to the module determines the amount of time the solenoids remain energized. Ground for the solenoids is supplied on circuit Z1.
Power for the seatbelt control timer module is supplied on circuits A45 and F13. The A45 circuit is a direct battery feed and is protected by a 20 amp fuse.
Circuit F13 is hot when the ignition switch is in the ACCESSORY and RUN positions only. This circuit is protected by a 10 amp fuse.
Ground for the module is supplied on circuits Z1 and Z2."
Figure 2: Schematic for the seat electronics. Click on the image for the full-sized version.
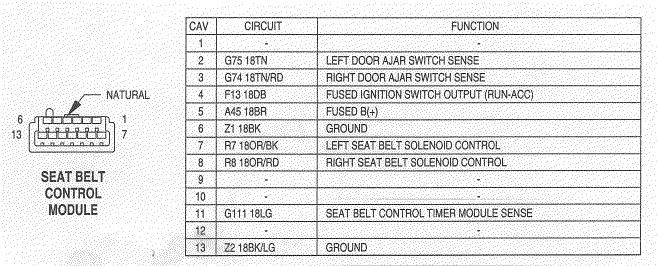
Figure 3: Pinout for the SCTM.
Hooking up the electronics is quite straightforward. Many of the wires simply plug into the SCTM and the seats. The connectors are keyed so that you can't easily plug them in incorrectly.
Once you have plugged in all of the connectors, gather all of the loose black wires, put terminals on them, and screw them to the floorboard at a common ground point. I chose to do this near where I mounted the SCTM.
You are now left with six wires that have no connectors on their ends: one seatbelt switch sense wire, three power wires, and two door ajar switch wires. At least five of these wires need to be extended to run around behind the driver's seat, then along the door sill, and finally up under the dash. I used split loom tubing to encase the wires and protect them from abrasion once hidden under the carpet. I also used a few adhesive cable clamps to keep wire bundles from twisting. The most important place to use cable clamps is under each seat since adjusting the seat position moves the wires.
Hooking up each wire is relatively simple. Important: Always disconnect the battery before working with any wires that have power!
- The seatbelt switch sense wire illuminates a light on the dash if the car is started without the driver's seatbelt being fastened. I didn't want that feature so I didn't hook this wire to anything; in fact, I cut it back. This wire is a light green/red 20 ga. lead.
- The SCTM has two power wires: one switched and one unswitched. The switched wire is a dark blue 18 ga. lead and it requires a 10A fuse. My fuse block had an unused switched fuse location so I used that, after upgrading the fuse to 10A. The unswitched wire is a brown 18 ga. lead and it requires a 20A fuse. I tapped into the unswitched power lug of the fuse block and installed an inline 20A fuse holder for this wire.
- The power seat mechanism uses a 16 ga. red wire and it requires a 20A circuit breaker. I tapped into the same unswitched power lug on the fuse block as above and installed a self-contained circuit breaker "can" on this wire. [6] Important: Do not use a fuse for this circuit. The power seats can draw a lot of current when first engaged so a circuit breaker is needed to handle the initial spike.
- The driver's door ajar switch uses a tan 18 ga. wire. The passenger's door ajar switch wire is a tan/red 18 ga. wire (1996-98). [7] I hooked both of them to the respective Corvair wires under the dash near the headlight switch. Consult the Corvair wiring schematic for your year car to locate the proper wires. [8]
Testing the installation
Testing the system is pretty easy:
- Roll down both front windows.
- Close both front doors.
- Reconnect the battery. You don't need to put the key in the ignition.
- Reach in and tug on each belt. Neither of them should move at this point.
- Open one of the doors.
- Reach in and tug on each belt. Both of the belts should move now.
- Sit down in the driver's seat and operate all of the power seat controls. They should all work.
- Close the door and let the car sit for at least 1/2 hour. Repeat steps 4-5 using the other door for step 4.
Finishing the installation
For my '66 coupe, I found that the latest improved molded carpet kit available from at least one of the Corvair parts vendors had enough extra material to nicely cover the extended length of the seat tracks. I worked with an upholsterer to recover the seats using reproduction vinyl with non-stock cloth inserts since the color of the seats I found was way off from my car's interior color scheme. He also repainted the plastic base trim to match. You may be able to use the original upholstery in your car, which in some cases is leather!
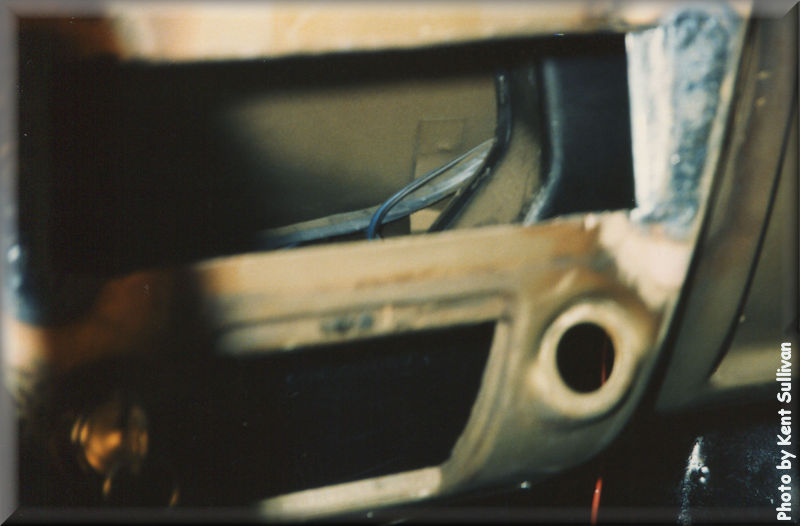
I find the shape of the Chrysler seats to fit in nicely with the interior lines of my Corvair and they are certainly comfortable, even for long trips, due to the dense foam used in them. Good luck with your own installation—it's worth the effort!
Acknowledgements
Thanks to my father-in-law, Mike Solon, for help with understanding the seat electronics and to Ken Thomas for transporting the seats from the salvage yard to me.
[1] Found on all Corvairs built February 1, 1966 or later.
[2] 1996 was the first year of the Sebring convertible.
[3] In 1999, the timer function was moved to the main Body Control Module (apparently to save parts cost) so "Timer" was dropped from the name. This is why I recommend using the electronics from 1996-98, even if you have to buy a new SCTM from Chrysler.
[4] Containing nine wires, not ten.
[5] A pinout is a description of the purpose of each pin in a multi-pin hardware connection interface.
[6] I used NAPA #CB6444.
[7] If you are using a 1999 or later wiring harness (not recommended), this wire is a tan/pink 20 gauge.
[8] Not all models came with both door ajar switches installed (cost saving measure).
